Getting Started
Watchy Kit w/ Case Assembly
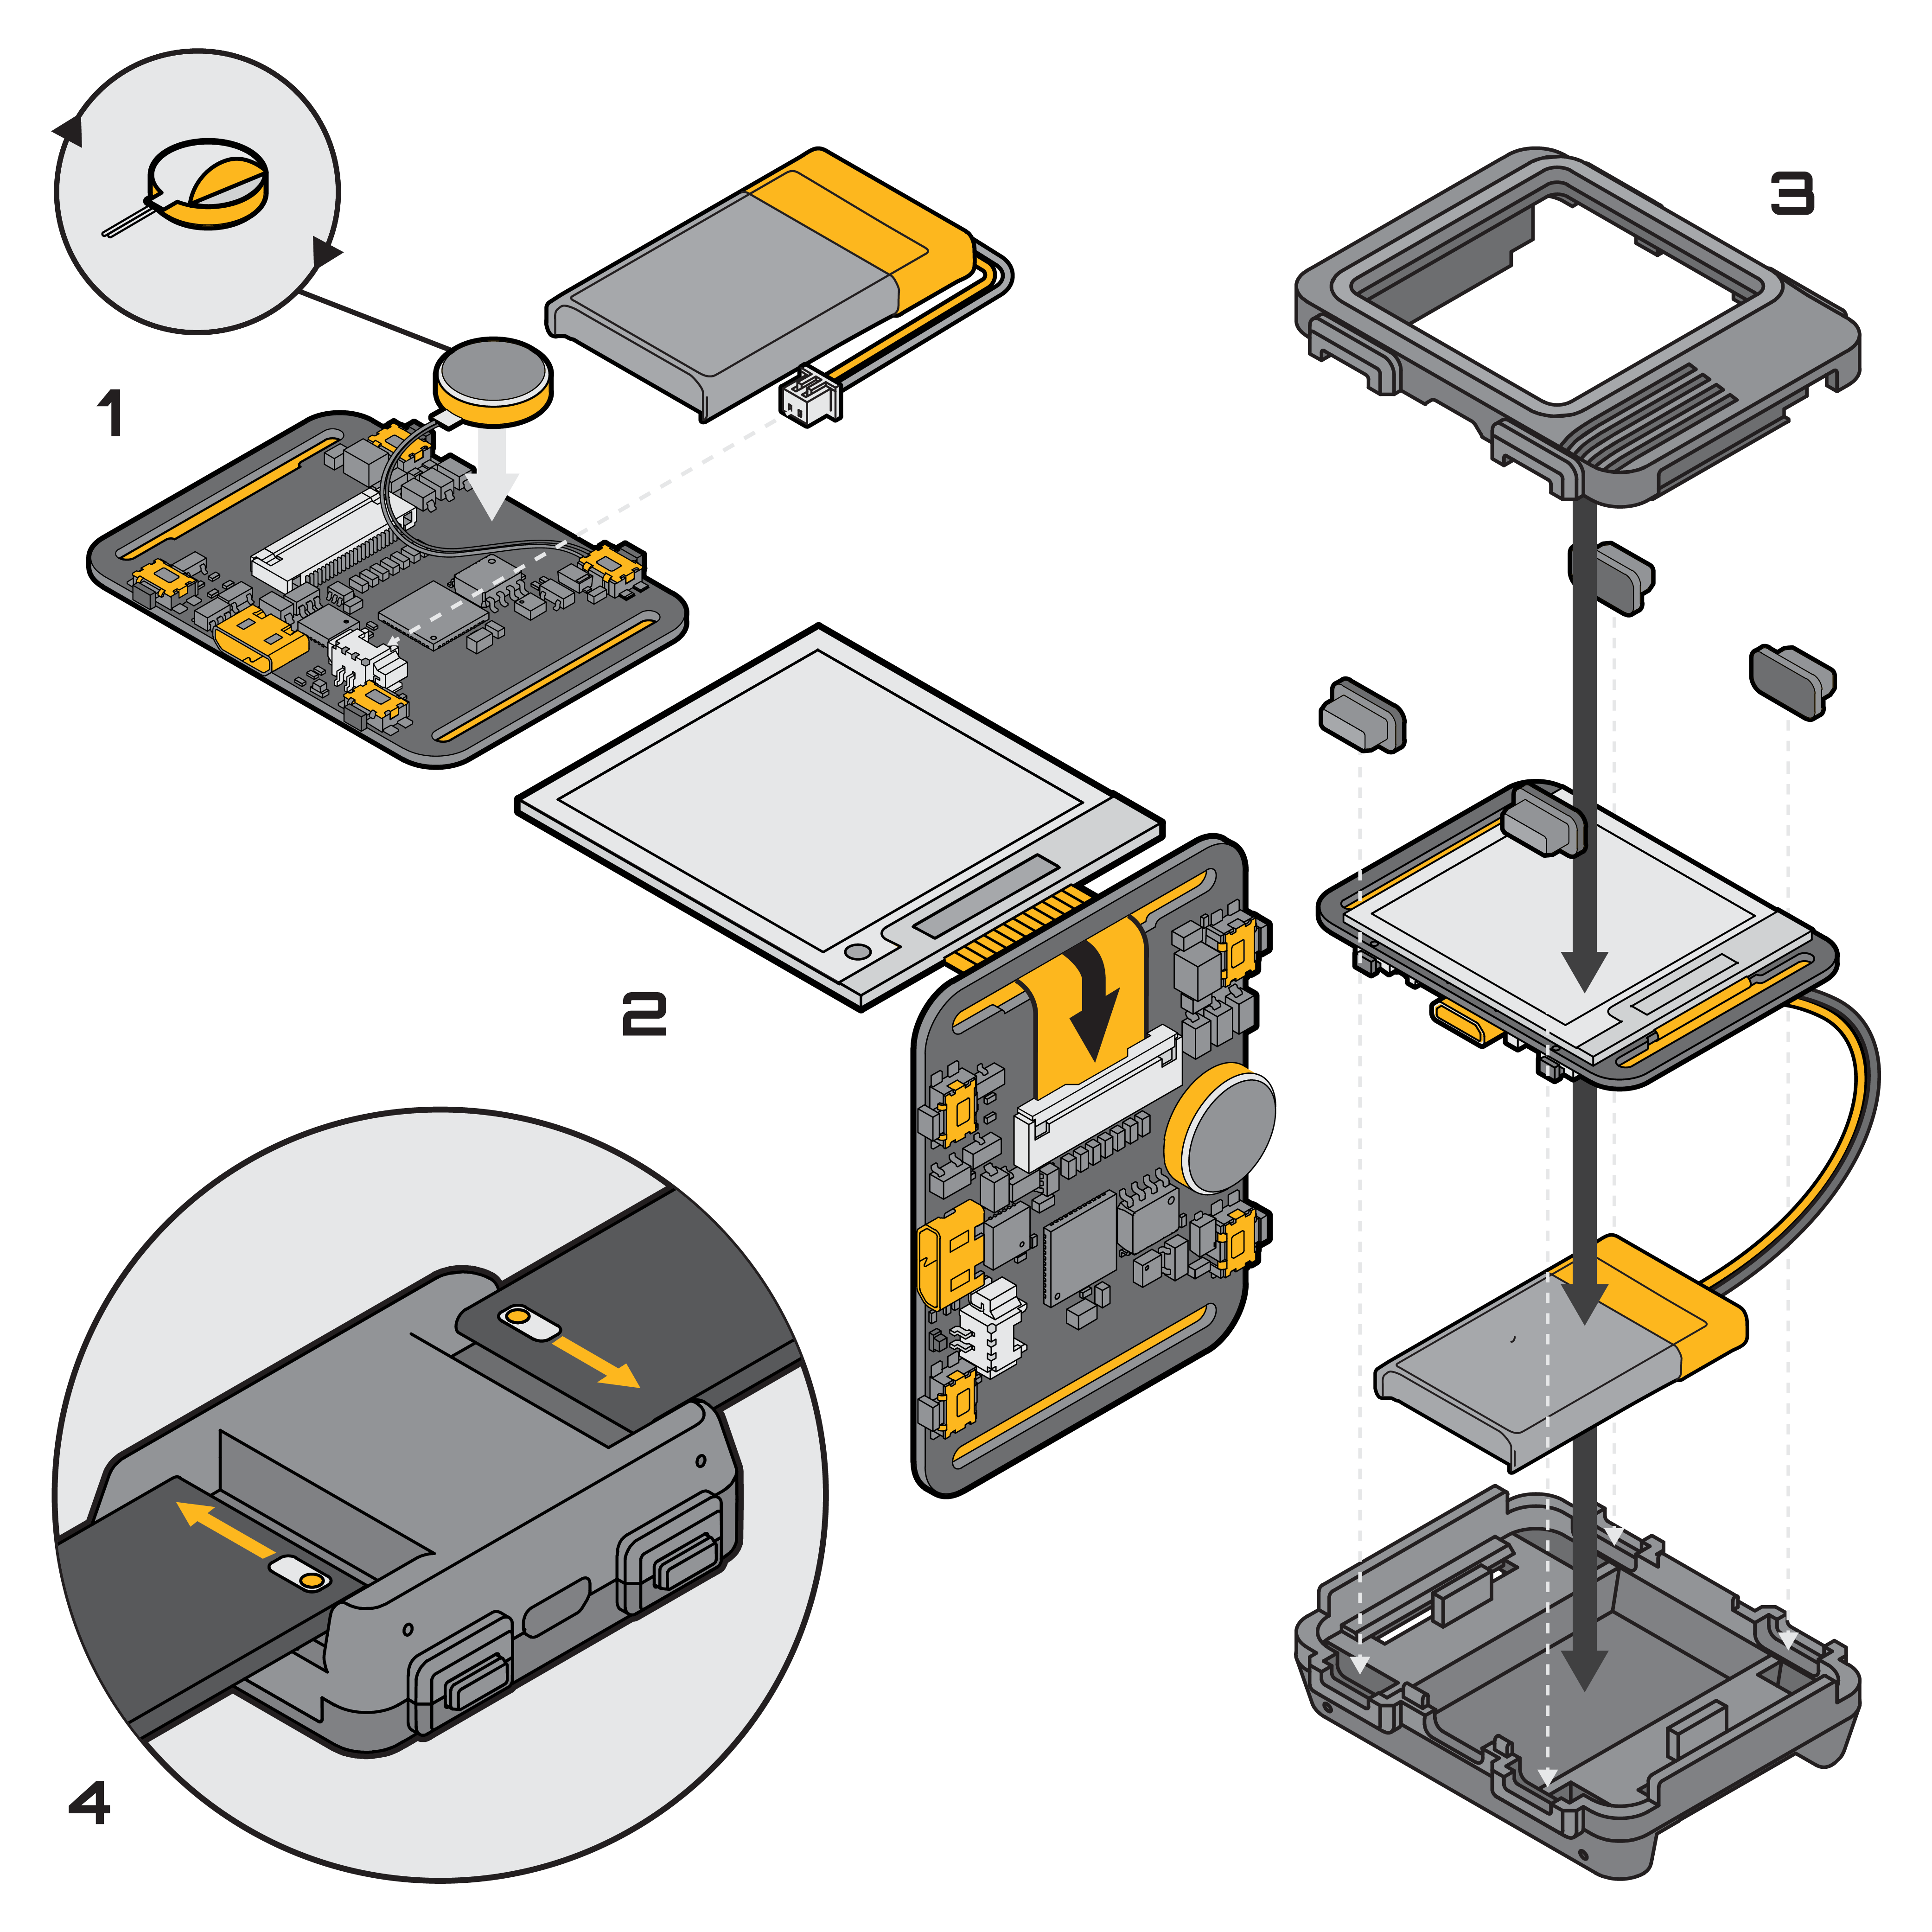
Before You Begin make sure you review the instructions and inspect for any missing or damaged components.
Remove The Components Carefully as they are tightly packed for maximum protection. The display is made of glass and will crack if you bend it!
Insert & Remove The Battery Carefully to avoid damaging PCB components
Test Your PCB to make sure the board is functional!
Do Not Apply The Included Tape!! Watchy can be assembled and secured with the included enclosure, without needing any tape. Only apply the tape if you intend to use Watchy without the enclosure, and have triple checked the screen is properly aligned.
- Connect the screen to the FPC connector: the ribbon cable goes through the PCB slot, as in the image above; the shiny gold pins on the ribbon cable must face up; pull the black tabs out slightly before inserting the cable, then push the tabs back in after to secure cable.
- Connect the battery
- Connect the USB to start charging the battery
- Press SW1 to bring up the menu/confirm
- Press SW3 & SW4 to navigate up/down
- Press SW2 to exit/cancel

- Wait 1 minute to check and see if the clock is updating the time correctly
Assembly Video: https://www.youtube.com/watch?v=ftLTrr_HTpI
Assembly Video (CNC Aluminum Case): https://www.youtube.com/watch?v=rbVr9eVb72M
Tips
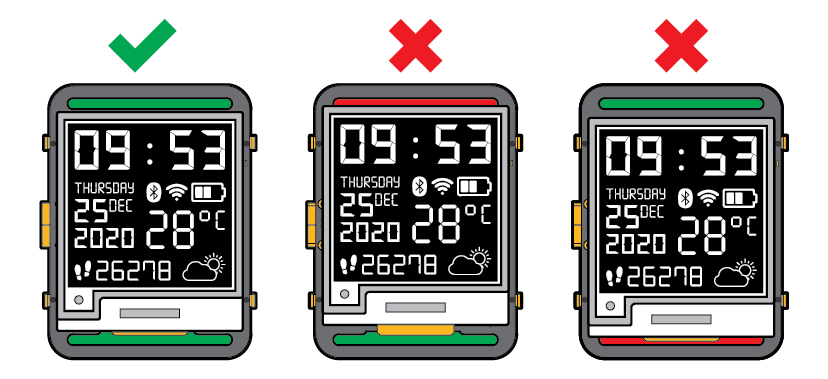
- Make sure the screen is perfectly aligned before taping it down! It should not extend above or below the strap holes on the PCB.
- Make sure the battery cable is tucked in when assemblign the case. Everything should fit snug and be aligned to the bottom case, before securing the top case.
- Do NOT force the case to close. It could break the screen & buttons! The case should close easily with the top and bottom snaps latching.
- Do NOT overtighten the screws in the aluminum case Overtightening will crack the screen! Make sure everything fits nicely and slowly adjust the screws to secure the case.
- Still having trouble? Check out this step-by-step guide on assembling the case in our FAQ
Arduino Setup
Watchy comes pre-loaded with firmware that demonstrates all the basic features. You can also try different watch faces and examples in Arduino.
Download and install the latest Arduino IDE
Start Arduino and open File > Preferences.
Under Additional Board Manager URLs add:
https://raw.githubusercontent.com/espressif/arduino-esp32/gh-pages/package_esp32_index.jsonOpen Tools > Board > Boards Manager and install the latest version of esp32 by Espressif Systems. Check to make sure you did not install Arduino ESP32 Boards by mistake.
Under Sketch > Include Library > Manage Libraries, search for Watchy and install the latest version
Make sure all the dependencies are installed i.e. GxEPD2 , WiFiManager, rtc_pcf8563,etc.
Enter Bootloader Mode
- To upload new firmware/watchfaces to Watchy, you will need to enter bootloader mode
- Plug in the USB on Watchy
- Press and hold the top 2 buttons (Back & Up) for more than 4 seconds, then release the Back button first, before releasing the Up button
- You should now see an ESP32S3 device enumerate a serial port i.e. COM, cu.*
Uploading New Watchfaces/Firmware
- Select the serial port for your Watchy
- If you can't find the serial port, repeat steps above for entering bootloader mode. Also make sure you're using a USB data cable and not a charge-only cable. Try different USB ports as well.
- Select Tools > Board > ESP32 Arduino > ESP32S3 Dev Module
- Select Tools > Flash Size > 8MB (64Mb)
- Select Tools > Partition Scheme > 8M with spiffs...
- Leave everything else as default
- Choose an example and click upload
- After upload is complete, reset Watchy to run the new uploaded firmware
How to reset Watchy
- Press and hold the top 2 buttons (Back & Up) for more than 4 seconds, then release the Up button first, before releasing the Back button
- Watchy should now reset, wait a few seconds for it to boot up and refresh the screen
Wifi Setup
- Click 'Setup Wifi' from main menu on the watch.
- Connect to 'Watchy Ap' wifi from another device such as phone or computer / laptop.
- Open 192.168.4.1 in the browser. (Note: on iphone this page will open automatically.)
- Click 'Configure WiFi'
- Enter SSID and password. (Note: SSID can be prefilled from the list of networks at the top of this screen)
- Hit 'Save' button and wait for Watchy.
- If connection fails, the watchy will display 'Setup failed & timed out!', otherwise it will display the local ip address and SSID of the connected network with confirmation.
Troubleshoot Wifi Setup:
- Click 'Info' from 192.168.4.1 page.
- Check your router setting to make sure the listed mac address is allowed.
- If there is still a problem, try clicking 'Erase Wifi Config' from the 'Info' page and wait for Watchy to restart itself. Then try the wifi setup again and it should hopefully work.