Create Your Own Watch Face
The Watchy library makes it easy to create your own custom watch face, we've provided a few examples that all use the same template.
Basics
To create a basic watch face, you need to simply override the drawWatchFace() method with your custom code, for example:
#include <Watchy.h> //include the Watchy library
#include <Fonts/FreeMonoOblique24pt7b.h> //include any fonts you want to use
#include "settings.h" //same file as the one from 7_SEG example

class MyFirstWatchFace : public Watchy{ //inherit and extend Watchy class
    public:
        MyFirstWatchFace(const watchySettings& s) : Watchy(s) {}
        void drawWatchFace(){ //override this method to customize how the watch face looks
          display.setFont(&FreeMonoOblique24pt7b);
          display.setCursor(25, 110);
          if(currentTime.Hour < 10){ //use the currentTime struct to print latest time
            display.print("0");
          }
          display.print(currentTime.Hour);
          display.print(":");
          if(currentTime.Minute < 10){
            display.print("0");
          }
          display.println(currentTime.Minute);
        }
};

MyFirstWatchFace m(settings); //instantiate your watchface

void setup() {
  m.init(); //call init in setup
}

void loop() {
  // this should never run, Watchy deep sleeps after init();
}
Design Tools
While you can code everything by hand, the community has built powerful tools to help you design watchfaces visually.
Watchy Watchface Designer (Web Tool)
For a modern, drag-and-drop experience, you can use the Watchy Watchface Designer.
- Drag & Drop: Add clocks, weather widgets, battery status, and shapes directly onto a virtual Watchy canvas.
- Live Preview: See exactly how your watchface will look on the 200x200 E-Ink display in real-time.
- Bitmap Code Preview: If you have existing C++ bitmap arrays, you can paste them into the Code Preview section to see them rendered instantly before adding them to your design.
- Instant Export: Generate a complete Arduino project (including
.ino,.h, and bitmap files) with one click.
Displaying Images/Icons
Since the E-Paper display is black and white only, you will need to convert any images/icons you wish to display into black and white first. The image then needs to be converted into a byte array, and stored in Watchy's flash.
Convert image to byte array (image2cpp)
You can convert your images to byte arrays using the web tool image2cpp
Upload your image and play around with the settings. If your image is already in black and white then you can just leave the brightness threshold to default, otherwise if it's in color, you can play with that setting to get the image to look right under preview.
In the Code Output format option, select Arduino code, give it a name under identifier and click Generate code. Copy the contents in the textarea and paste it in a
*.hfile in the same directory as your Arduino sketch.In your watch face file e.g.
myFirstWatchFace.ino, include that header file e.g.#include "myImage.h"Use
display.drawBitmap(x_origin, y_origin, imageByteArrayName, width, height, color)in thedrawWatchFace()method to display your image. The order of these draw/print statements matter, so if you calldisplay.drawBitmap()first, followed bydisplay.println("Hello World!"), the text will be on top of the image.
Using Fonts
You can use custom fonts by converting them first with the tool truetype2gfx
Upload your font of choice and set the font size. Click Get GFX font file to download the font file e.g.
Seven_Segment10pt7b.h.In your watch face file e.g.
myFirstWatchFace.ino, include that header file e.g.#include "Seven_Segment10pt7b.h"Use
display.setFont(&Seven_Segment10pt7b)to set the current font face (don't forget the ampersand before the font name). You will have to call thedisplay.setFont()method each time you wish to use another font. Usedisplay.setCursor(x, y)to set where to start printing text, the coordinates refer to the lower left corner of the text to be printed.
Quickly Testing Changes
As you develop more complicated watch faces, the repeated process of making a change, compiling it, and uploading it to your Watchy can be cumbersome. It is also challenging to double-check that your watch face can handle all possible conditions (such as weather conditions and step counts) when all your physical Watchy has is real life to report on!
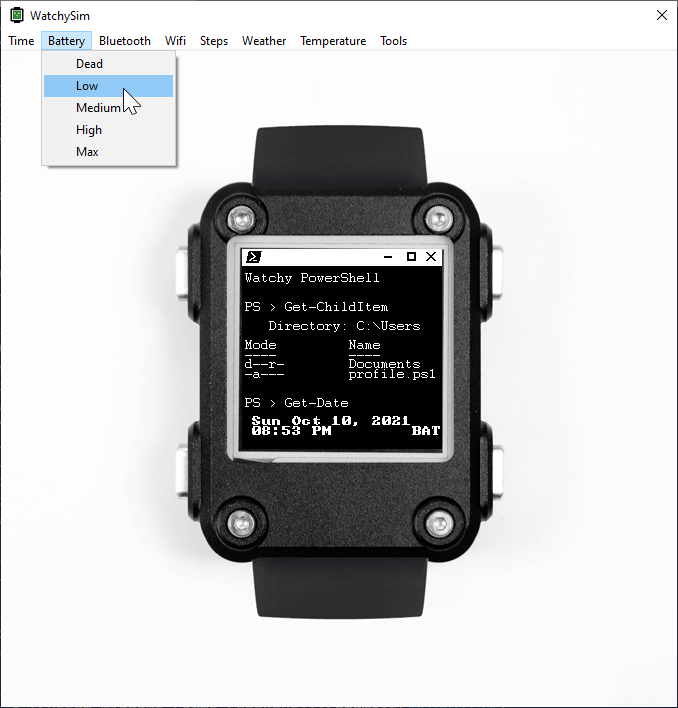
For these reasons, the community has developed WatchySim - a simulator for Watchy. WatchySim gives you a Watchy-like SDK to develop your watch faces, but lets you test them in a standard Windows GDI-based application.
If you are interested in exploring that approach, check out WatchySim on GitHub.
Share Your Watch Face!
We'd love to see what you've created! Share your watch face with us and we'll post it on our gallery:
- Take a screenshot of your watch face! Follow the instructions here
- Make sure you have a GitHub repo with the source code, and a 200x200 screenshot of the watch face (must be a black and white *.bmp or *.gif)
- Add your watch face to the bottom of this
json filelike so:
    {
        "id" : "ID_NUMBER",
        "name" : "WATCH_FACE_NAME",
        "author" : "AUTHOR",
        "screenshot" : "SCREENSHOT_URL",
        "source" : "GITHUB_URL",
        "ota_bin" : false,
        "version" : "VERSION_NUMBER"
    }
- You may want to check for other PRs so your ID number is the latest
- Submit the PR for review and merge